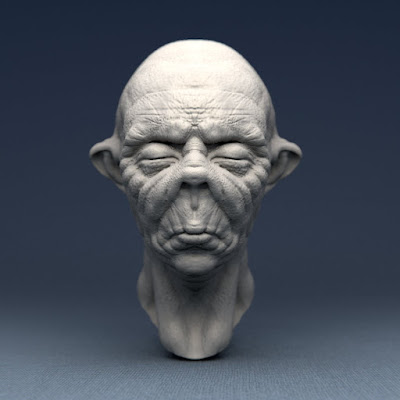
sketches #9

another doodle with sculpting GSOC branch. I didn't realize until I was rendering, that the mesh only had about 300k faces...and,all along, I was wondering why I couldn't get sharp detail while sculpting ...I'm such a fool...


Also, I've recorded the process with blender 2.5 screencast feature, here's the video:


Comments

  1. Very cool, what were your render/lighting settings? They look very clear and realistic....

    email: todd@resonancemedia.ca

    ReplyDelete
  2. Hey Todd!

    sorry for the delay, I've been having some trouble with my connection and couldn't go online.

    The scene is lighted with 1 area lamp and some indirect lighting, ambient occlusion and environment lighting with render25 branch. The reason it looks so clear is because of the improvements done in that branch.

    I'll try to post screenshots of the settings and/or the file later when I get my connectivity problems solved.

    ReplyDelete

Post a Comment

Popular posts from this blog

Open Sourcing

Some days ago, I caught myself ranting while doing a test recording for a tutorial. I've been asked several times to produce a sculpting tutorial, but, since I'm still learning and still trying to figure out a lot of things, always ended up with the feeling that everything I could say has already been said. So, the only point for it would be to talk about the Blender specific topics. But there aren't many things about my work flow that are Blender only. I think I covered all the needed settings and the brushes I use lately with the Onion branch in the following pdf. Click the image to download the file. So, my rant was about how there is all this free knowledge online about sculpting, but, a lot of Blender users seem to neglect it because they only look for Blender tutorials. And that gave me the idea. Publish a list of all the videos and tutorials I've been gathering, and let everyone compile their own build of 'Sculpting with Blender'. Even thoug

sculpt_startup.blend

Everything should happen in the 3D View Following what I said in my UI proposal some time ago, and with Dyntopo having its options in the Tool Shelf, I've made some adjustments to my default Sculpt layout. Only the 3D View with an open Tool Shelf is needed to start sculpting now, removing even more unnecessary choices and making access to Sculpt Mode in Blender easier. Ctrl+UpArrow shows the full layout which contains the 3D View, an Outliner set to 'visible layers', and the Properties window. With this layout you can sculpt various objects without having to leave Sculpt Mode, selecting them from the Outliner. Here's a demo video of a few objects sculpted with Dyntopo and the current layout: We could switch a few more things to the 3D View to make the two extra windows redundant. Matcap or Material assignment. In past GSOC projects, a Matcap selector was coded and added to the Properties panel of the 3D View. While I liked it, and

Noise

Cave painting. Shaman Barcelona chair Credits for the chair scene: http://www.blendswap.com/blends/author/marcin_hrn/ http://www.blendswap.com/blends/author/pcraven/ http://www.blendswap.com/blends/author/lsmft/ http://www.blendswap.com/blends/author/jclevet-net/ http://www.blendswap.com/blends/author/nikitron/ http://www.blendswap.com/blends/author/metalix/